HTML5 Canvas Particles Revisisted — With Physics!
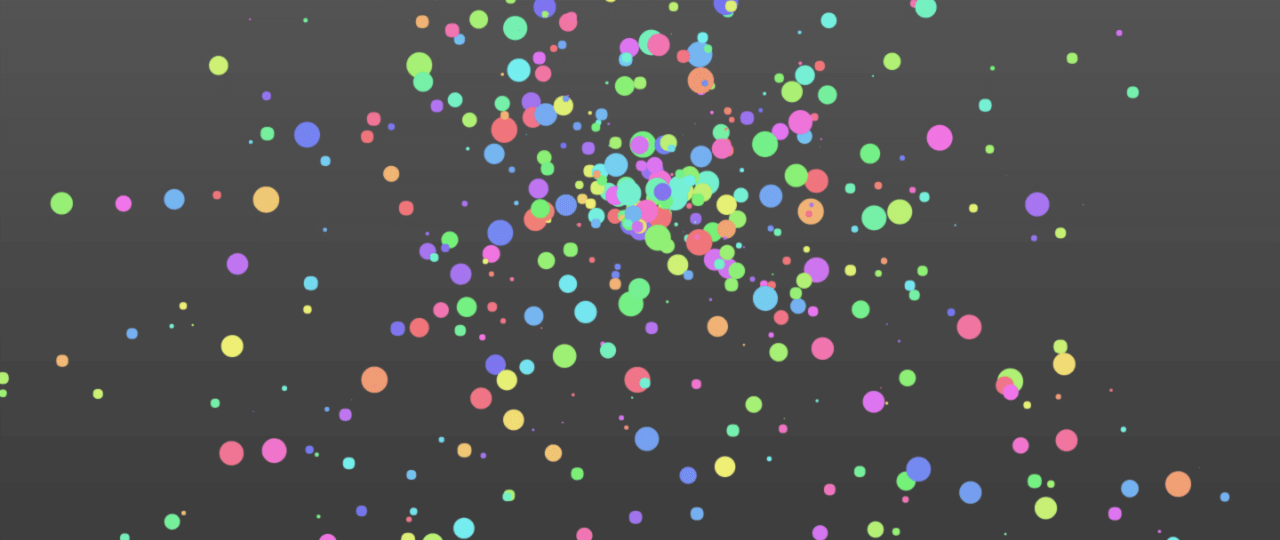
While I wrote a few years ago about HTML5 canvas particle effects, I’ve gotten a lot of questions about the effect I have on my new personal site. No, not the crazy swirling thing on the left—we’ll go over that another time—but the fun little bouncy ball thing. Go ahead and check it out. I’ll wait.
Pretty cool, right? It’s written entirely without any framework or library like jQuery or D3.js or Three.js. While they’re pretty handy for compatibility, data visualization, and comprehensive 3D graphics rendering (respectively), I didn’t have much of a need for something so straightforward. Plus, it makes it easier to understand the mechanics of it all when I write about it.
Which is right now. (Duh doy.)
The Setup
HTML-wise, this isn’t terribly complex. In fact, all we need is a canvas to draw on. Like, literally.
1 2 3 4 5 6 7 8 9 10 |
For styles, we can keep it simple, too. All we want is to make sure the canvas is where we want it.
1 2 3 4 5 6 7 8 9 10 11 12 13 14 15 16 17 18 19 20 | html, body, #bubbles { border: 0; margin: 0; padding: 0; width: 100%; height: 100%; } body { background: linear-gradient(to bottom, rgba(91,91,91,1) 0%, rgba(58,58,58,1) 100%); } /* Only if you want the hover effect */ #bubbles { opacity: 0; transition: opacity 0.8s ease-in-out; } #bubbles:hover { opacity: 1; } |
The JavaScript
While not terribly complex, let’s break it down into bite-sized chunks.
1 2 3 4 5 6 7 8 | var canvas = document.querySelector('#bubbles'), context = canvas.getContext('2d'), particles = [], last_draw = undefined, MAX_PARTICLES = 100, CANVAS_WIDTH = 0, CANVAS_HEIGHT = 0; |
All this does is instantiate and set the necessary variables. canvas is the DOM node, context is the drawing context, particles is where we’ll track all the particles we create, and last_draw will be used for requestAnimationFrame() calculations.
The rest of the variables are constants for drawing. They should mostly speak for themselves.
1 2 3 4 5 6 7 8 | function setDimensions(e) { CANVAS_WIDTH = canvas.clientWidth; CANVAS_HEIGHT = canvas.clientHeight; canvas.width = CANVAS_WIDTH; canvas.height = CANVAS_HEIGHT; } setDimensions(); window.addEventListener('resize', setDimensions); |
This is how we make sure the canvas stays the right size. The CSS styles will make sure the canvas stays full, but you need to set the HTML attributes to make sure the drawing functions properly. It’ll run every resize event.
1 2 3 4 5 6 7 8 9 10 11 12 13 14 15 16 17 18 19 20 21 22 23 24 25 26 27 28 29 30 31 32 33 34 35 36 37 38 39 40 41 42 43 44 45 46 47 48 49 50 51 52 53 54 55 56 57 58 59 60 61 62 63 64 65 66 67 68 69 70 71 72 73 74 75 76 77 78 79 80 81 82 83 84 85 86 87 88 89 90 91 92 93 94 95 96 97 98 99 100 101 102 103 104 105 106 107 108 109 110 111 112 113 114 115 116 117 118 119 | function Particle() { var self = this, pos_x = 0, pos_y = 0, vel_x = 0, vel_y = 0, acc_x = 0, acc_y = 1.5, color = 0, radius = 0; this.reset = function(){ // Centralize position self.setPosX(CANVAS_WIDTH / 2); self.setPosY(CANVAS_HEIGHT / 2); // Randomize velocities self.setVelX(Math.random() * 40 - 20); self.setVelY(Math.random() * -30); // Also randomize the radius self.setRadius(Math.random() * 15); // And finally the color self.setColor(Math.random() * 360); }; this.setColor = function(c){ if (typeof(c) === 'number') { color = c; } }; this.getColor = function(){ return color; }; this.setRadius = function(r){ if (typeof(r) === 'number') { radius = r; } }; this.getRadius = function(){ return radius; }; this.setPosX = function(x){ if (typeof(x) === 'number') { pos_x = x; } }; this.setPosY = function(y){ if (typeof(y) === 'number') { pos_y = y; } }; this.getPosX = function(){ return pos_x; }; this.getPosY = function(){ return pos_y; }; this.setVelX = function(x){ if (typeof(x) === 'number') { vel_x = x; } }; this.setVelY = function(y){ if (typeof(y) === 'number') { vel_y = y; } }; this.getVelX = function(){ return vel_x; }; this.getVelY = function(){ return vel_y; }; this.setAccX = function(x){ if (typeof(x) === 'number') { acc_x = x; } }; this.setAccY = function(y){ if (typeof(y) === 'number') { acc_y = y; } }; this.getAccX = function(){ return acc_x; }; this.getAccY = function(){ return acc_y; }; this.step = function(tdiff){ // Move position self.setPosX(self.getPosX() + (self.getVelX() * tdiff)); self.setPosY(self.getPosY() + (self.getVelY() * tdiff)); // Alter velocities self.setVelX(self.getVelX() + (self.getAccX() * tdiff)); self.setVelY(self.getVelY() + (self.getAccY() * tdiff)); // Detect boundaries if (self.getPosX() - self.getRadius() <= 0 || self.getPosX() + self.getRadius() >= CANVAS_WIDTH) { self.setVelX(self.getVelX() * -1.0); } if (self.getPosY() - self.getRadius() >= CANVAS_HEIGHT) { self.reset(); } }; this.reset(); } |
Here is the workhorse object. It’s the Particle object that contains all of the movement functions.
It all kicks off from the reset() function. It centers the particle within the canvas and then randomizes the initial velocity, radius, and color. Color is pretty cool because you are just randomizing against an hsl() value and picking a hue somewhere on the spectrum with some bubble gum-style saturation and lightness.
The physics of it all is super simple. If you remember your high school kinematics, then you’ll get this.
It’s all handled in the step() function. Acceleration, velocity, and position are broken into their component X and Y vectors. The acceleration will always stay the same, though you can tweak it to make the particles fall faster or slower. Velocity is impacted by the acceleration, resulting in the position coordinates.
newVelocity = oldVelocity + (acceleration * timeDelta);
You’ll also notice inside step() that if a particle’s edge also hits the edge of the canvas, it’ll bounce back. You can add a dampening effect by changing self.setVelX(self.getVelX() * -1.0); to some other value less than 1.0, which is more realistic but less fun.
And then if the particle clears the bottom of the canvas, it’ll reset to the center with a new radius, color, and velocity.
Now for particle instantiation, which is also pretty simple.
1 2 3 | for (var i = 0; i < MAX_PARTICLES; i++) { particles.push(new Particle()); } |
And finally, we just write another step function that is called by requestAnimationFrame(). If you haven’t used it before, it’s a nice way to tell the browser to throw to an animation callback when it’s appropriate to do so. Paul Irish still has the gold standard on explaining why you should be using it.
1 2 3 4 5 6 7 8 9 10 11 12 13 14 15 16 17 18 19 20 21 22 23 | function step(timestamp) { if (last_draw === undefined) { last_draw = timestamp; } // Clear the canvas context.clearRect(0, 0, CANVAS_WIDTH, CANVAS_HEIGHT); // Draw the particles for (var i = 0; i < MAX_PARTICLES; i++) { context.beginPath(); context.fillStyle = 'hsl(' + particles[i].getColor() + ', 80%, 70%)'; context.arc(particles[i].getPosX(), particles[i].getPosY(), particles[i].getRadius(), Math.PI*2, false); context.fill(); // Force particle movement calculations particles[i].step((timestamp - last_draw) / 50); } last_draw = timestamp; window.requestAnimationFrame(step); } window.requestAnimationFrame(step); |
The gist of it is you clear the canvas and then iterate through the list of particle objects to draw them and step() them. In this case, I’ve taken the time delta and scaled it down so it animates at a reasonable rate.
If you’re not familiar with canvas drawing, these steps are rather uncomplicated. You start be defining a new path, its fill style (our random HSL color), drawing a circle via the arc() context method, ad then filling it. Easy!
Party Time!
And that’s it! You can check out a live demo if you don’t believe me.
If you have any questions, shout at me in the comments. I’ll gladly answer anything you’ve got. It’s pretty simple stuff, but even simple things are hard the first time you do it. Having someone light the way makes it a lot more digestible.
Bye, Internet friends!